Easy Buttermilk Biscuits Recipe


Making your own delicious buttermilk biscuits at home is super  easy with this recipe. These buttermilk biscuits come out so light and flaky you’ll never want store bought again! Quick and easy to make they’re great fresh out of the oven. They freeze well and are easily re-heated too! For a quck walk through on the recipe check out the video posted below.


Ingredients

2 1/2 cups of flour
                                                                      1 tsp salt
                                                                      2 tsps sugar
                                                                      1/4 tsp baking soda
                                                                      2 tbs baking powder
                                                                      1 cup of buttermilk
                                                                      1/2 cup butter

Directions

Combine your dry ingredients in a bowl, add butter cutting it in with a fork or pastry cutter until you have a coarse cornmeal like texture. Add your buttermilk mix well until all the flour is incorporated. Knead lightly for just a few moments ( you don’t want to melt the butter). Take dough out of bowl roll it out into a square then roll up as if you were making a swiss roll. Roll it out into a square again, repeat the rolling and rolling up another two times. Then cut out your bicuits, place on a baking tray and bake at 425 degrees farenheit for about 10 or 15 minutes until gokden brown on top. Remove let sit on a wire rack for a few minutes then serve. Enjoy!
 

Cheesecake Recipe Easy Perect Every Time


This incredibly easy cheesecake recipe makes a perfect cheesecake every time! No cracks and no sinking in the middle. The problems most people encounter when baking a cheesecake is cracking and sinking. It looks perfect and  gorgeous while cooking,  then suddenly a crack appears marring that beautiful top! To make matters worse their cheese cake then sinks in the middle forcing them to get a little creative when decorating it. This cheesecake recipe does away with all that! It make a perfectly level cheesecake every time, and as a bonus there will be no cracking! It’s topped with a homemade strawberry syrup (so easy to make) and  fresh strawberries. The filling is light, creamy and fluffy and this New York Style cheesecake has an easy to make graham cracker crust. Check out the video below for the recipes both the cheesecake and strawberry syrup are included! 


Ingredients

Filling

2 packages of  softened cream cheese
1 cup of sour cream
1 cup of mascarpone cheese
1 cup of heavy cream
2eggs
3/4 cup granulated sugar
1/2 cup powdered sugar
1 1/2 tsps vanilla extract
3 tbs of lemon juice (freshly squeezed preferably)
1 1/2 tsps lemon zest
4 tbs flour

For the crust

2 cups of crushed graham crackers
4 tbs melted butter

Strawberry Syrup

1 cup of strawberries plus one cup for topping
3/4 cup sugar
1/2 cup water
dash of lemon juice


Directions

Prepare pan. Use a springform pan, grease the sides with butter and line with parchment paper, line the bottom of the pan with a round of parchment paper as well. Prepare your graham crackers by puring in melted butter and mixing them well. Pour graham cracker mixture into bottom of pan pressing down firmly making sure they are well packed in there. Wrap the outside with aluminum foil. Prepare your filling. Cream the cream cheese, add the sour cream, mix until creamy, mix in the eggs, mix in the sugars, mix in the mascarpone cheese, mix in the heavy cream, mix in the vanilla, mix in the lemon juice, mix in the lemon zest,mmix in the flour. Whisk everything well. Pour batter into pan. Place pan in a shallow baking pan with some water in it and bake at 325 degrees farenheit and bake for one hour. After one hour turn oven off, crack the door open and let cheesecake sit for at least an hour. After that remove cheesecake from oven, let cool thoroughly and place in fridge to cool for at least four to six hours. Overnight is even better! 

Strawberry Syrup

Slice one cup of strawberries, add sugar, add lemon juice, stir well then cook on medium heat stirring occasionally until mixture reduces and starts to look foamy. Try not to let strawberries totally disintegrate. Let cool a bit then strain syrup. It will be thick so stir syrup in strainer to help it through. Set aside the leftover jam, you can have it as a jam. To serve toss some fresh sliced strawberries with a bit of the syrup until lightly coated. Place some of the sliced coated strawberries on cheesecake slice, then drizzle on some of the syrup. Enjoy!


How To Make Your Own Yogurt No Machine Needed


An easy recipe for making your own yogurt at home no machine required! With this quick and simple recipe you can easily make your own nice, thick creamy yogurt at home without any special equippment. Your homemade yogurt will contain more probiotics, be free of unhealthy additives and will taste far better than store bought yogurt. 
It only takes a few minutes to do aside from the waiting time and you’ll have an amazing super healthy yogurt in the end! For easy to follow directions and tips & hints check out the video below.


Ingredients

1/2 Gallon of whole milk
6 to 8 ounces of yogurt with live active cultures

Directions

Add your milk to a pot and heat to 100 degrees farenheit. Remove from heat and transfer to another container with a lid. Try to avoid using a metal container. Whisk the yogut into the warm milk well, then cover and let sit in a warm area for at least six to eight hours. You can safely leave it for up to 12 hours. If you like you can wrap it in a towel to help keep it warm. After the eight hours, take the yogurt and place it in the fridge to cool. This will help stop the culture from growing and allow it to set. After approximately 2 hours take the yogurt drain off any excess whey if there is any, stir until creamy and serve. You can cover and store the rest in the fridge. Enjoy!

Lasagna Recipe Easy Fresh Pasta


This incredibly delicious lasagna recipe made with fresh pasta sheets and homemade ricotta cheese is super easy to make and will take your lasagna to a whole new level. You can make this lasagna with store bought noodles and ricotta as well, it will still be super delicious, but using the fresh pasta and homemade ricotta really brings it over the top! It’s well worth taking that little bit of extra time to do it as your lasagna will come out amazing! Check out the video posted below for the full recipe, easy directions and the trick to getting your ricotta super creamy whether you’re using store bought or homemade!


Ingredients

1 medium sized red onion
3 cloves of garlic
several stalks of celery
4 medium sized carrots
3 fresh vine ripened tomatoes
Several tablespoons to 1/4 cup of vegetable or olive oil
1 pound of 50% mix of chopped beef/veal or sausage
Several teaspoons parsley
Salt and pepper to taste
1/2 teaspoon crushed red pepper
2 cups tomato puree or crushed tomatoes
12 lasagna sheets
2 cups ricotta cheese
2 cups mozzeralla cheese
1/4 to 1/2 cup heavy cream with a splash of mik
1 to 1 1/2 cups grated parmesan reggiano or pecorino romano cheese depending on your taste

Dice vegetables and tomatoes. Take a large pot cover the bottom with oil, when oil has warmed add vegetables sautee lightly, add tomatoes, let cook until soft, add ground meats, brown well. Add tomato puree salt,pepper,crushed red pepper and parsley stir well then reduce heat, cover and let cook for about an hour check on it occassionally. Prepare your lasagna sheets dough. Grate your cheeses and prepare your ricotta cheese by stirring in the 1/2 teaspoon salt,heavycream/milk and parsley. Stir until creamy. Roll out pasta dough , cut into sheets and drop into boiling water for about a minute placing them on a greased pan so as not to stick. Assemble lasagna by placing some sauce on the bottom of your pan, then a layer of lasagna sheets, then a layer of ricotta cheese, a layer of mozzeralla cheese, sprinkle with parmersan cheese then another layer of lasagna sheets. Keep going until all your layers are done.  Cover with tented aluminum foil (so your cheese doesn’t stick to it) bake at 350 farenheit for about for minutes, then remove foil, let cook for another 15 minutes or until golden brown on top. Remove and let cool for about 20 minutes half an hour before cutting. Serve and enjoy! 


Lasagna Sheets Homemade Pasta No Machine


Making fresh pasta at home without a pasta machine is incredibly easy. Homemade fresh pasta is more nutritious, tastier and superior to store bought in every way. This fresh pasta recipe for lasagna sheets can be used to make any kind of pasta you like and it’s well suited for lasagna sheets.  It’s a firmer dough which is what you want when making lasagna sheets. You want that pasta to be able to support the sauce and cheeses without having to roll it out too thick which would not go well in the dish. This recipe is just perfect for that. It makes a sturdy dough that you can roll out to just the right thickness. Making it is a breeze, and if you haven’t made lasagna with fresh pasta sheets before it will change how you make lasagna forever. Using fresh pasta and homemade ricotta takes lasagna to a whole new level. One that’s incredibly delicious! For the full recipe with step by step directions  check out the video posted below.


Ingredients

4 cups of flour
4 to five eggs
1/2 to 1 teaspoon salt
a few drops to a tablespoon of oil

Place flour on a board making a well in the center for the eggs, add the eggs into the well with the salt. Mix the eggs with a fork or spoon gradually pulling the flour in until ingredients are incorporated, drizzle with a bit of oil, the turn dough onto counter and start kneading. Kneading is the most important step here as you want to develop those  gluten strands so need well. At least 5 to ten minutes. If your dough is too dry flours vary, you can add an extra egg. Once you’re done kneading roll dough into a ball, wrap with plastic wrap and refrigerate for at least an hour. After that you can foll it out and cut it into sheets. Enjoy!

Ricotta Cheese Recipe Super Easy


A super easy ricotta cheese recipe that yields an amazing and delicious creamy ricotta cheese. Making your own ricotta cheese at home is way easier than you might think. This ricotta cheese recipe only requires four simple ingredients and a little bit of time. Your own homemade ricotta cheese will be far tastier than store bought versions. Once you make your own you’ll never go back to store bought again! For the full recipe and easy to follow step by step directions check out the video posted below.


Ingredients

5 cups of whole milk

1 cup of heavy cream

1 tsp salt

3 tablespoons to 1/4 cup freshly squeezed lemon juice or apple cider vinegar

Directions

In a large pot heat milk, cream and salt to 200 degrees farenheit. Stir in lemon juice, if mixture fails to curdle add more lemon juice or apple cider vinegar. Natural lemons vary in acidity so you may need more acid in your mixture. Stir mixture lightly so as not to break up the curds, then let sit for 10 minutes to half an hour. The curds will have settled on top. Strain mixture using a coffee filter, cheescloth, or fine mesh over a large bowl. Give a gentle shake so that the whey strains through and let sit for one hour. After an hour gather cheesecloth ends together lift up cheese mixture and squeeze a bit to remove any excess whey, place ricotta in a container, stir, cover and refrigerate. It will keep fresh for approximately a week. Enjoy!

Mini Heart Cakes


These mini heart cakes make the perfect Valentine’s Day treat! A moist gloden cake, filled with a pink buttercream frosting, and then double dipped in dark and white chocolate, these are so delicious you’ll want to make them all the time! They are actually fairly easy to make and can be a wonderful special treat any time of the year. Aside from being really easy to make they’re also great fun to make! Drizzled with chocolate as a finishing touch they look especially pretty when being served as well! For the full recipe watch the video posted below easy to follow it takes you through the recipe step by step. 


Full Recipe Mini Heart Cakes


Cake 


2 cups of flour

1 1/2 cups of sugar

2 teaspoons baking powder

1/2 teaspoon baking powder

1 teaspoon salt

2 eggs

1/2 cup oil

1 1/2 tsp vanilla extract

1/2 tsp orange zest

1/2 cup milk

1 cup water


Buttercream Filling

1 stick butter

2 cups powdered sugar

1 tsp vanilla extract

A few drops of red food coloring


Chocolate coatings

16 ounces dark chocolate (or chocolate chips)

16 ounces white chocolate

8 tbls vegetable oil


Donuts Recipe Easy With Chocolate And Vanilla Glaze


When it comes to donuts it dosen’t get better than homemade!Fresh donuts are best when it comes to taste experience as far as donuts are concerned and it doesn’t get fresher than homemade. You’re also in control of the ingredients so they can be a little healthier as well. Orange zest and vanilla are used to flavor  the dough lending a light and fresh flavor to these donuts making them super delicious! This donut recipe is really easy and makes a wonderful fluffy donut. You can top these with the super easy to make glaze recipe that I’ve included or you can just roll them in cinnamon sugar. You’ll love these light fluffy donuts either way! For easy to follow instructions and the full recipe watch the video below. 


Donuts Recipe Easy 


For the dough


  • 1/2 to 2 cups flour
  • 1 tsp salt
  • 1 package yeast
  • 1/4 cup sugar
  • 1 egg
  • 2 tablespoons butter
  • 1 cup warm milk
  • 1 teaspoon vanilla extract
  • 1 teaspoon orange zest
For the Icing
• 1 cup powdered sugar
• 1 tbs vegetable oil
• 1/2 tsp vanilla extract (use clear extract for the vanilla)
 2-3 tbs water (use milk for the vanilla)
•1/2 cup cocoa powder for the chocolate

In a large bowl mix together the warm milk, yeast, salt and sugar. Cover and let rest for five minutes or until yeast starts to foam. Then mix in butter, egg, vanilla extract and orange zest. Add flour gradually then knead by hand. When dough reaches a nice smooth consistency form into a bowl and let rise for about 40 minutes or until it doubles in size. Roll out dough , cut out donuts and let rise on a lightly greased surface for about 20 minutes. Fry in vegetable oil for about a minute or two on each side on low very heat. Flip over to ensure even browning. Place on a wire rack intially then transfer to parchment paper or paper towels. Parchment paper has less chemicals and will absorb any excess oil that hasn’t dripped off while on the wire rack. While donuts cool make your Icing! Take one cup of powdered sugar in a medium bowl, add vanilla extract and oil, stir a bit, add cocoa powder if making chocolate, then add water or milk gradually stiring until you reach the consistency you want.
Dip and twist donuts into glaze.
Let set for a bit.
Eat and enjoy!


Easy Lemon Bundt Cake Recipe


A simple basic lemon bundt cake recipe. Sometimes the simple things in life can be the best. This lemon bundt cake is so easy to make you’ll love it! Moist and delicious, flavored with lemon and a hint of vanilla it’s topped off with a vanilla/lemon drizzle icing. Yogurt in this recipe is what keeps this cake moist and flavorful adding just a little bit of extra zing to that lemon and the vanilla balances it all out creating a wonderful lemon flavor with depth. For the full recipe with easy to follow instructions check out the video below.


Cake

2 cups of flour
1 1/2 cups of sugar
2 eggs
8 ounces of yogurt
1 tsp vanilla extract
2 tsp lemon zest
2 tbs lemon juice
1 tsp salt
2 tsp baking powder
1/2 tsp baking soda

Simple Syrup

1 tsp lemon juice
1/2 cup water
1/4 sugar

Icing

1 cup powdered sugar
1/2 tsp vanilla extract
1 tsp lemon juice
1 tsp vegetable oil
2 tbs milk


Whole Wheat Bread Easy Recipe


Whole-wheat bread made from 100% whole-wheat flour is higher in fiber, vitamins, and minerals than breads made from refined wheat.Most commercially made breads labeled as whole wheat in the US, actually have very little whole grain wheat. They’re mostly made from white flour with caramel color added to give the illusion that they have more whole wheat than they actually do. 


Humans have been baking bread for thousands of years. Wheat was domesticated in the Fertile Crescent, an area in the Middle East, known as one of the cradles of civilization ,an area where farming first emerged.


You could say bread gave rise to society as we know it today. It played a key role in the  formation of human society. As cultivation spread from the Middle East towards Europe, North Africa,and then Asia it led to a more structured society, towns were created, and a less nomadic lifestyle was possible. This is turn led to more shophisticated and organized forms of society. In the Amercas this also happened with maize and in China with rice.

i


Remnants of a flatbread made from wild wheat and wild barley,dating back to between 14,600 and  11,600 years ago have been found in the Black Desert of Jordan. Bread dating back over 9,000 years has also been found at neolithic sites in Turkey and Europe. There has been much evidence of bread baking in ancient Egypt with sourdough being their preferred and primary source of leavening.


In medieval times in Europe bread was part of the table service, with food served on a piece of stale bread called a trencher, as a sort of absorbent dish. When you were done with your meal, you could eat your dish!


Up until the nineteenth century bread in Europe was made with extremely harmful ingredients like chalk,sawdust, alum, plaster and even clay.

That came to an end in the late 1800’s with the passing of the Food Adulteration Act in Britain. It was however more difficult in the United States as different states have different regulations for bread making.


Bread baking was industrialized in the early twentieth century. Whole grain breads were discovered to have higher nutrional content in that time period as well. 


Chemical additives are used in commercially prepared breads to speed up mixing, rising time and enhance texure.Some very good reasons to make your own. Aside from that your bread will be far tastier, there is nothing better than a nice hot loaf of bread fresh out of the oven! Check out the video posted below for an amazingly easy 100% whole wheat bread recipe with easy to follow instructions.


Ingredients


3 1/2 to 4 cups of whole wheat flour

1 1/2 cups of water

1 tablespoon of honey

1teaspoon of salt

1 package of dry active yeast.

2 tablespoons of olive or vegetable oil


Directions


In a large bowl add the water, honey, oil, salt, and yeast mixing well until everything is thoroughly dissolved. Cover and let sit for 5 minutes or until you can see the yeast bubbling on the top.


Gradually add in flour until firm enough to knead. Knead for about five minutes by bring the outer edges of the dough to the center and pressing down firmly.

Place dough in a lightly oiled bowl, cover and let sit for 30 minutes.

Knead a bit until dough is smooth, about 3 to 5 minutes. Cover and let rise for 40 minutes or until dough has doubled in size.


Warm oven slightly, then turn off. (only needed in cold weather)


Place dough in lightly greased pan, brush with water, make several cuts on top, sprinkle with sesame seeds (optional) then let rise a bit more in an oven that is warm but not turned on.


Preheat oven to 350 degrees farenheit


Once dough has doubled in size bake at 350 degrees for about 15 to 20 minutes or until golden brown on top.


Set on a wire rack to cool.


Slice and enjoy!


Corn Muffins Super Easy Recipe


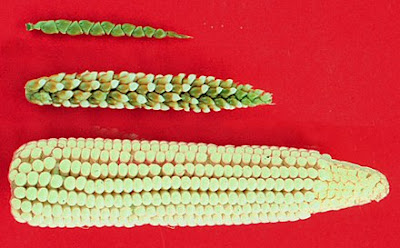
For thousands of years corn called maize,has been ground and used to make all kinds of breads. The corn we use today started out over 10,000 years ago as a plant called teosinte which grew in southern Mexico. 


Teosinte was very different from the corn we grow today. The undomesticated plants were much smaller, bore only one cob and it’s kernels were much smaller and harder. It took thousands of years of human cultivation to get it as it is today. Evidence has been found to indicate that it was cultivated as far back as 6,000 years ago in the Tehuacan Valley of Mexico.


The Aztec and Mayan civilizations used stoneground cornmeal to make tortillas and tamales. For many Aztecs cornmeal was a primary source of sustainance, consumed with beans it created a perfect protein. It has been used as a staple food around the world for many centuries.


In the United States the use of corn was introduced to settlers by Native Americans.  While wheat crops thrived in the north and wheat breads were the popular choice, it was too hot and humid for wheat crops to thrive in the south. Corn crops were planted instead and did very well. Cornbreads became very popular as they were easy yo make. The original cornbreads were very basic being a simple mixture of cornmeal and water which was then baked over an open fire. Eventually other ingredients started being added, eggs,butter, and milk and that is how corn bread as we know it today was created. 


Very easy to make corn bread, or corn muffins take only a few minutes to make and are a perfect as a treat on their own or as a side to a meal. Check out the video below for my favorite super easy recipe.


Ingredients: 1 cup cornmeal 1 cup flour 1cup milk 2 1/2 tsp baking powder 1 teasp salt 1/4 cup oil 1 egg In a bowl mix together all your dry ingredients. In a seperate bowl whisk together the egg, milk and oil. Once thoroughly mixed slowly add the dry ingredients mixing just until moistened. Do not over mix. Spoon into muffin tins or pour into greased and floured loaf pan and bake at 350 degrees farenheit until lightly golden brown on top. Approximately 15-20 minutes depending on your oven.